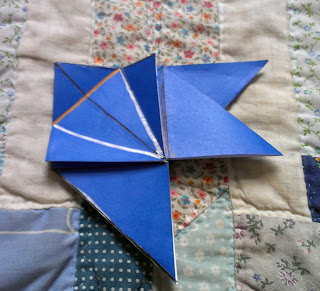
I have folded many flapping birds, and this model, developed by Ligia Montoya, is my favourite. My instructions are adapted from those in Robert Harbin's Secrets of Origami.
Step 1. Crease a square sheet of paper into nine squares. Then, crease from corner to corner.
Step 2. First, crease diagonally across the upper middle square, as well as the middle right square. Then,
fold along the marked lines, into the shape shown in step 3.
Step 3. Fold the marked lines, to form the next shape.
Step 4. Make a new flap by mountain folding the left square, and valley folding the right one.
Step 5. This is quite complex step, and if I were a more dutiful blogger I would have taken pictures that illustrated it in full :( Behind the gold line, there should be a kind of hidden flap. Pull it out, and then valley fold it along the gold line. The end result should look like a pinwheel, as shown in the next picture.
Step 6. Valley fold the upper blue triangle along the golden line. It, and and half of the white square, will come down in one layer. Ignore the pen. I just needed it to hold down the left triangle, because otherwise you couldn't see the golden line.
Step 7. Valley fold the left-most flap 90º along the golden line.
Step 8. Squash fold the flap that's sticking out into a mock square base.
Step 9. Petal fold the mock square base. If you've never done a petal fold before, it's easy! First, crease along gold and silver lines. Then, mountain fold along the silver lines, and valley fold along the golden ones, until it resembles the next picture.
Step 10. Basically, what you need to do is get the triangle on the far right in-between the legs of the petal-folded diamond. Since this is difficult to describe, I have included lots of photos showing this stage.
Step 11. Crease, then squash fold, along the silver line on the flap. This will result in another mock square base.
Step 12. This step is optional. Crease the mock square base from the top edge to the bottom, along the horizontal black line. The doesn't really do anything, but it will help guide you in the next step!
Step 13. Crease the golden and silver lines, then form a petal fold along them. The end result should should be an irregular hexagon, illustrated in the next step.
Step 14. Valley fold the irregular hexagon in half. Mountain fold the rest of the figure in half.
Step 15. Can you see the rough shape of the bird? Inside reverse fold the neck. Mountain fold in both sides of the tail.
Step 16. Finally, form the head of the bird by inside reverse folding the tip of neck.
The finished bird! It will flap its wings if you pull its tail while holding its chest.


Ahhhh! Looks complicated!!! But so cool ;) I am definitely having a go at this!
ReplyDeleteOh, please do! As long as you're careful folding the steps, it shouldn't be too hard!
DeleteHey, I've nominated you for a Liebster Award! For more details go here:
ReplyDeletehttp://gorillalegs.blogspot.co.uk/2013/07/liebster-award.html